Colourful Norwich skyline illustration

Michael Sage

IT, Digital & Culture

Smart Static – Hardware

I have a page on my smart home blog that covers the hardware currently in use (and retired). I thought I would do the same for my smart static. Again the aim for this hardware is to use as little bandwidth as possible and as sympathic to the fact it’s a place to relax! This page will be slightly different to the smart home one as the whole system needs to be operated without me or computers being there! 

Amazon Alexa Logo
Amazon Fire Logo
Eufy Logo
Raspberry Pi Logo with text

Alexa

Amazon Alexa, is a virtual assistant, first used in the Amazon Echo and the Amazon Echo Dot smart speakers. She is the central “hub” to all my systems, start with an Echo Dot and build it from there! The ‘van will have a 4th gen dot and dot with clock, for music and smart control


Amazon Fire Tablet

As well as acting as another echo device the fire tablet will be wall mounted to act as a control panel for the smart static. The tablet will be removable so that it can be used any where in the caravan as a second screen, a reading device or a simple web / android tablet. 

Eufy

Cheap and good cameras that support a range of storage options and a decent app and ecosystem.

Remotely available and utilise local storage. A win in a low bandwidth situation!

Raspberry Pi

The brains of the operation. A local RTSP endpoint for the camera, a plex media server, data storage and all round good egg!

Looking at the possibility of utilising a second one for home assistant for full non-cloud offline testing.

Roku Logo
GL-iNet Logo
TP-Link Kasa Smart Logo
OpenWrt Logo

Roku Streaming Stick

In my opinion the best streaming client available. A huge number of apps including Prime, Netflix, UK TV and Plex. 

Will stream direct from the Pi plex server when there is no internet.

GL-Inet GL-AP1300LTE

Network in a box. Access point, switch, modem, VPN, firewall, and probably some other stuff.

The GL will be the only networking device in the ‘van. Providing everything from the guest network, to the routing, VPN and switching.

TP-Link Kasa

Smart plugs (3 way with USB) and bulbs. Kasa forms the smart functions for the lighting and electric points in the ‘van. 

The beauty of the kasa system is they are fully supported in home assistant and have local “button” control. A nice low / no bandwidth solution for the van.

OpenWRT

The OS under the GL-Inet skin. A Linux operating system for embedded devices.

Instead of a single, static firmware, it provides a writable filesystem with package management.

It allows you to customise the device to suit any application.

Raspberry Pi OS logo
Home Assistant Logo
Flic Button Logo

Raspberry Pi OS

Raspberry Pi OS (formerly Raspbian) is a Debian-based operating system for Raspberry Pi.

Since 2015, it has been officially provided by the Raspberry Pi Foundation as the primary operating system,

The static pi is running RPi OS and as a debian system there are a huge number of packages available to customise and tweak.

Home Assitant

An opensource home automation platform. Used in the smart van to link flic and kasa locally… No internet required. This gives users a 3rd hardware only option if they don’t want to use Alexa or the Kindle fire tablet.

Flic

Two flic buttons linked to the home assistant raspberry pi. This allows users to press an “actual” button to control the lights and scenes in the van without talking to Alexa or using the tablet. This solution will also work offline should there be limited internet connection at any point. 

Adventures in Static Caravan World…

In the Spring of 2021, my partner and I bought a static caravan by the North Norfolk coast. It’s an older 2007 Delta Santana. We have so many ideas of what we want to do with it. 

It will probably come as no surprise that I want to smart the hell out of it, but be sympathetic to the fact it’s also meant to be an escape.

Over this blog I intend to cover, mostly, smart things, but stuff we’ve learnt along the way.

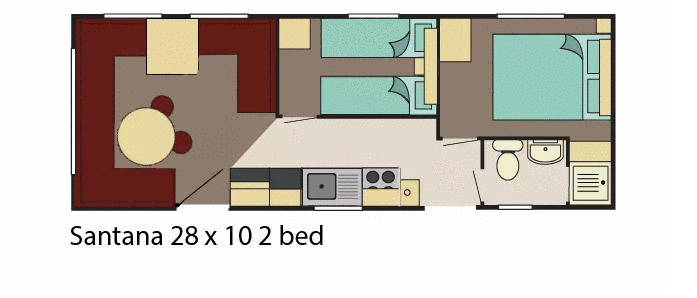
Floor plan of Santana Static Caravan

So here is a list of things I will be covering in future blog posts, this list will probably change and only covers the smart stuff, I will also put some DIY thoughts and tips as we go too.

Men on a Girder (New York) with androids instead of men!

The Future…

Once we are in an settled I suspect there will be another iteration of smarts, one thing I haven’t done is any type of local smart control. As blog readers will know I love flic buttons and once the Alexa routines works I think it will be a lovely small addition. The Flics also work with home assistant for cloud free control, which leads on to… 

Home assistant, depending on how good the internet connection is, this might never be a thing, however, given all the components will work with home assistant there is an opportunity to remove cloud connections and put in another Pi for a dedicated HA server. 

Motion sensors, shelly have released a wifi motion sensor with a 3 year battery life that can toggle anything these could form a smart security system or be used for light control, again I would suspect full HA integration.

Finally Kasa also have a range of switches available in the states that might make it to the UK.

As you can see the future is more about control, both physical and virtual.

The Future is here, a shelly motion sensor has been ordered, I think these could be something really special!

A Couple of PDFs…

Over the last couple of months I have relied on a couple of web articles to get me through particularly specific issues. I hope these sites will remain available forever… However, I have “printed” the sites to PDFs to make sure they are available should the sites disappear / migrate / melt… etc

pfSense - Mikrotik Open VPN

The key piece of information in this one is around the client specific override!

Unifi CK2+ Backup

How to backup a Unifi controller / CK2+ using the amazing rclone.

Proxmox vTPM Win 11

A guide for setting up vTPM for virtual machines running on proxmox 7 (NB: This is no longer needed as proxmox 7 now has vTPM built in)

SES – SNS -Lamdba – Dynamodb – Alllll the AWS

I’ve been using SES for a while for sending email from servers.

A few months ago one of my servers was compromised and I discovered there is no such thing as good logging in SES…. whooops… Amazon suspended my account and this lead me to investigate how I could get some visibility of SES logging. This was considerably harder than I would have thought. There are no SMTP logs, not real recording of any information and no diagnostics. I nearly left SES for this, then I decided to use it as a learning opportunity to understand more about AWS & SES.

I used this guide to get it all working: https://blog.andreev.it/?p=5513

Hopefully this site never goes down, if so I will need to write my own guide! 

It’s easy to add extra fields to the database. These are all the objects available https://docs.aws.amazon.com/ses/latest/DeveloperGuide/notification-contents.html

Finally this docker image allows you to connect to dynamodb easily https://github.com/YoyaTeam/dynamodb-manager

The only thing I haven’t managed to do is find out which IAM user actually sent the email… I need to do more research on this to try and enhance my logging further.

AWS Logos for SES, SNS, Lamdba and Dynamodb

Emergency Pi Zero

I have had a couple of requirements recently where I have needed to leave a device onsite for remote access. I initially thought that the best way to handle this would be to put a pi onsite that joined my VPN and then I could connect to all the machines on the remote network and do my troubleshooting like that…

I looked at my pi shelf and there looking all little and shiny was a Pi Zero… At this point I thought to myself… what do I actually need from this device.


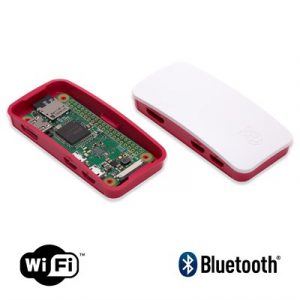
Pi Zero 2 W Photo


I have a couple of Emergency Linux VMs on dedicated servers that run a lightweight GUI with pretty much just a web browser. These emergency VMs work with VNC, but VNC isn’t running all the time. You SSH into them and as part of the login it fires up a VNC session and when you log off it tears the connection down. So you SSH in with 2FA, this starts the VNC Server (with a password), when you finish you log out and it clears down the VNC session. I also installed a cron job that checks the devices external IP address and emails you when it changes (for when it goes into a residential setting).

Here’s how it’s setup

  • Install Raspberry OS (with desktop)
  • Enable SSH
  • Add to .bashrc

if [[ -n $SSH_CONNECTION ]] ;
vncserver
fi

  • Add to .bash_logout

 vncserver kill :1

When you arrive onsite, connect the pi zero to the network, add a port forward for port 22 and 5901 to the pi. Check the IP emailer works (see link above).

Migrations & Pi KVM

Over the last month I have migrated my home server from a Gen 8 HP Microserver to a Lenovo P500 workstation. There are many reasons for my migration the two biggest were that I was being constrained by the amount of RAM the Microserver could take (16Gb vs 512Gb), the processor was also becoming a bit of a bottle neck.

The second was that in my professional life I have moved from VMWare ESXi to Proxmox and my home lab was the only ESXi server that I was left managing, it also meant I wasn’t reflecting my professional install base so making it hard to test things.

Migrations are horrible, no matter how much planning you do, they take time and suck! No matter how many trials and tests you do there will always be something.

I used an old desktop PC with a 500Gb SATA drive and a 240Gb SSD to migrate all servers other than the Windows server (not enough space or grunt).

Although exceptionally boring and probably of no interest to anyone this was my migration plan..

  • Shutdown new host
  • NIC in new host
  • Check Second Network Card
  • Restore firewall
  • Copy all Proxmox machines from test proxmox host 
  • —–
  • Migration
  • Copy latest backup
  • Run Full backup c:\backups\backup.bat
  • Check USB disk on another PC
  • Close OneDrive
  • Restart PC
  • Check OneDrive is stopped
  • Shutdown VM
  • Convert System Disk
  • Check Proxmox Boot
  • —–
  • Move 2Tb disks to think station
  • Create new ZFS 2Tb for File Server
  • Boot File Server
  • Add 1.8Tb disk
  • Setup OneDrive if needed

20/02/2020 20:12 <JUNCTION> data [d:\data]
17/09/2020 08:48 <JUNCTION> media [D:\media]
17/09/2020 09:07 <JUNCTION> server backups [D:\backups]

  • Start OneDrive
  • Undisable Start with Windows OneDrive
  • Check shares
  • Remove “to watch” from backups
  • USB pass through
  • Setup Proxmox Backups (Exclude File Server d drive)
  • —–
  • Remove SSDs from Microserver and check
  • Rebuild Test Proxmox as Hobby PC with 240Gb SSD
  • —–
  • Take old Hobby PC
  • Check 120Gb SSDs
  • —–
  • 2FA for SSH and Proxmox on New Host
  • Add New Host to Nagios

This was all in a text file which I constantly updated and changed during the actual migration. It went well and there were only a couple of hiccups. The testing had paid off.


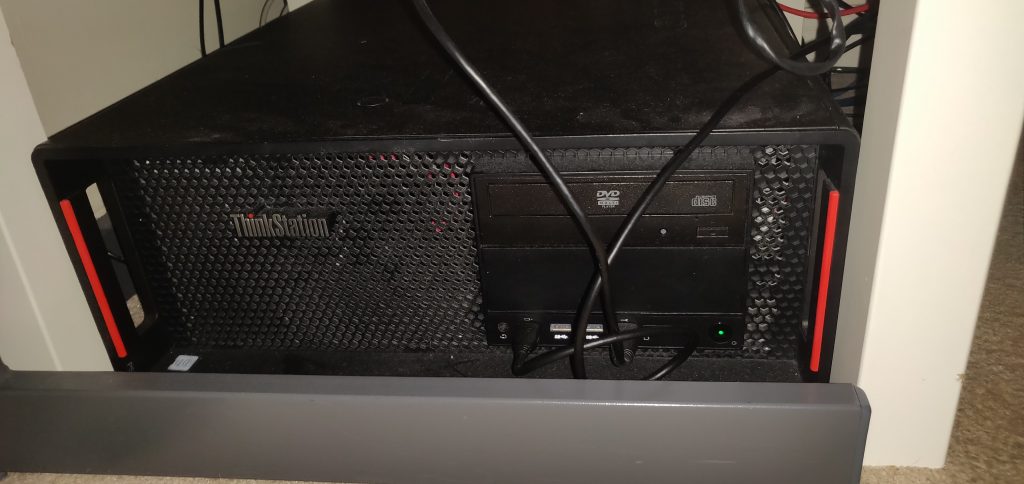
Photo of ThinkStation Home Lab

Hopper – New Host

Running proxmox with a number of Windows, Linux and BSD VMs.

  • Intel(R) Xeon(R) CPU E5-2609 v3 @ 1.90GHz (1 Socket)
  • 48Gb RAM
  • 2x 480Gb NAS SSD (ZFS), 2x 3Tb NAS SATA (ZFS), 1x 2Tb SATA (Backups)

The two USB cables – One going to an external HDD for file level backups, the second goes to the Pi KVM (for keyboard and mouse control)

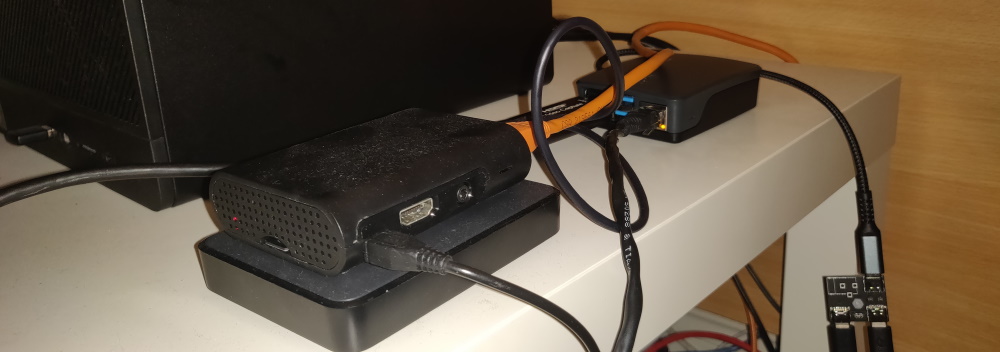
Photo of two Raspberry Pi's one with an external hard drive and one with power hanging over the edge (whoops)

The Pis

Tron – Pi 3+
4Tb USB Drive
Backup Pi (Rsync and rclone)

IP KVM – Pi 4 (2Gb)
Power/Data Splitter at the back
USB to HDMI Capture Card

Both are cabled into the network. The Pi 2 only has 100Mbps network, so it’s likely to need replacing soon to keep up with my internet, but for now it works! The Pi 3+ has “Gb network” however due to it using the same USB bus it can only realistically achieve 300Mbps.

Pi KVM

This part of the project nearly got it’s own page… However, I don’t have much to say! One of the biggest drawbacks of migrating to the workstation was that I lost iLO (intelligent lights out / IPMI). I use iLO rarely but it is an incredibly useful when you do need it!

I was looking at aftermarket cards and IP based KVMs and they are expensive! I couldn’t justify the cost for a single host or the amount of time I use it. 

Then I came across Pi KVM, it looked hugely daunting until I started reading about it. For simple KVM features (and a host of other features) it was incredibly easy to build a Pi 4 KVM (you can use other Pi generations but you will need to do more work). Just one cable and an HDMI capture card and it just works! 

They are also developing their own Pi HAT with all the features (including power management (i.e. remote reboot)), I’ll probably buy one when they are released as I can think of a number of locations where a sub £100 KVM would be a life saver, especially with the remote reboot abilities.

Pi KVM can be found here: https://www.pikvm.org/

Another Pi KVM project can be found here: https://tinypilotkvm.com/

Bits I bought to make my Pi KVM

That was it! I had a case, power supply and SD card knocking about any way… When the hat is released I will need to think about a different case.

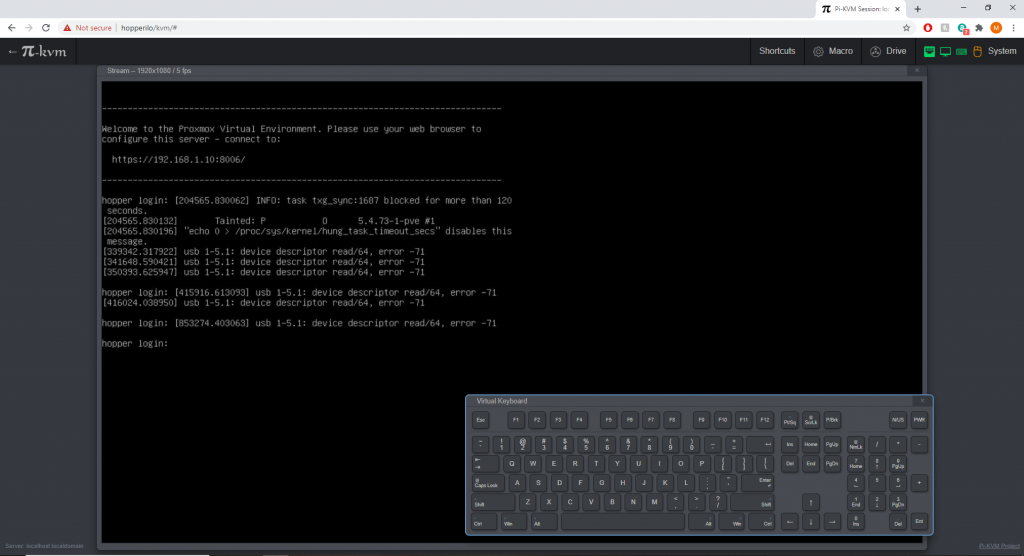
Screenshot of Pi KVM in a web browser
Pi KVM (Currently only using KVM, power control to come later)

Cloudkey 2+ Let’s Encrypt & Backups

Let's Encrypt using DNS on Cloudkey 2+ & Backups

Update: 16/02/2021 – For CK2+ off controller backups see this great how-to: https://lazyadmin.nl/home-network/backup-unifi-controller-to-cloud/

Update: 22/12/2020 – Use this script instead: https://glennr.nl/s/unifi-lets-encrypt

Stolen from the UI community site, but copied here in case Unifi change their forums again or it gets lost to the mists of time (Original URL: https://community.ui.com/questions/How-To-Lets-Encrypt-with-Cloud-Key-and-DNS-Challenge/)

Uses the domain my-domain.xyz, one shortcoming is that my current external DNS provider doesn’t have an API, so I have to manually complete the challenge every 3 months, but the whole process takes just a few minutes so I’m not too concerned.

All steps are performed directly on the Cloud Key.

First, install Git and obtain the Let’s Encrypt code:

cd /home

sudo apt-get update

sudo apt-get install git

git clone https://github.com/letsencrypt/letsencrypt

Next, generate a certificate, specifying that you want to use a DNS challenge for proving ownership of the domain.

certbot certonly --manual --preferred-challenges dns --email notification-email@my-domain.xyz --domains unifi.my-domain.xyz

In this example, unifi.my-domain.xyz is an internal hostname that resolves to my cloud key, and notification-email@my-domain.xyz is an email address where I’d like Let’s Encrypt to send me a reminder when the certificate is about to expire.

Since we are using a DNS challenge, you will be prompted to create a TXT record with your DNS provider.  Let’s Encrypt will confirm that the DNS record is visible from their cloud infrastructure, thus proving you own the domain, and it will grant your certificate.

Next, stop unifi, since we’re about to mess with its certificates:

service unifi stop

Next, make a backup of the existing certificate data and remove it:

mkdir cert_backup

cp -r /etc/ssl/private/ cert_backup

rm /etc/ssl/private/cert.tarrm /etc/ssl/private/ssl-cert-snakeoil.key

Next, export your newly-granted Let’s Encrypt certificate into a format that Unifi understands:

cd /etc/letsencrypt/live/unifi.my-domain.xyz/

openssl pkcs12 -export -in fullchain.pem -inkey privkey.pem -out cert.p12 -name unifi -password pass:your_certificate_password

Here, your_certificate_password is a temporary password of your choosing to protect the exported certificate.

Next, import the Let’s Encrypt certificate into the Unifi keystore:

keytool -importkeystore -deststorepass aircontrolenterprise -destkeypass aircontrolenterprise -destkeystore /usr/lib/unifi/data/keystore -srckeystore cert.p12 -srcstoretype PKCS12 -srcstorepass your_certificate_password -alias unifi

Note that aircontrolenterprise is the Unifi keystore password; it is not a password of your choosing.

In this command, /usr/lib/unifi/data/keystore is actually a symlink pointing to the /etc/ssl/private directory from earlier.

At this point, the Unifi Controller will work with your Let’s Encrypt certificate, but recall that the Cloud Key has a separate internal nginx-based webserver to handle OS configuration options.

Next, replace the default certificates in the location nginx is expecting them, and make sure the permissions are correct:

cp fullchain.pem /etc/ssl/private/cloudkey.crt

cp privkey.pem /etc/ssl/private/cloudkey.key

chown root:ssl-cert /etc/ssl/private/*

chmod 640 /etc/ssl/private/*

tar -cvf cert.tar *

chown root:ssl-cert cert.tar

chmod 640 cert.tar

Finally, restart nginx, protect and start the Unifi controller.

service nginx restart

service unifi-protect restart

service unifi start

At this point, they should come up and be using your Let’s Encrypt certificate.

Set a calendar reminder for ~2 months from now so you don’t forget to redo this before the certificate expires!

This guide simply re-arranges the hard work that others have done into a solution that fits my specific needs.  The author (pcoldren) used bits and pieces from the following resources while writing it:

https://community.spiceworks.com/how_to/128281-use-lets-encrypt-ssl-certs-with-unifi-cloud-key

https://tom-henderson.github.io/2015/06/05/unifi-ssl.html

https://serverfault.com/questions/750902/how-to-use-lets-encrypt-dns-challenge-validation

https://www.c0ffee.net/blog/unifi-cloud-key-ssl-certificate

https://www.naschenweng.info/2017/01/06/securing-ubiquiti-unifi-cloud-key-encrypt-automatic-dns-01-challenge/


November 2020 Update

November 2020 - Update

The new echo has arrived it’s another decent iteration on the echo line up and has replaced the main echo in the living room. The old echo is now in a stereo pair in my daughter’s room and the sound is impressive! 

The switchbot curtain bots have arrived and the dining room now has Alexa powered curtains! I’ve added another provider, but… the unifi instant camera has shipped so it looks likely the NEOS cams will be gone by the end of the year.

I’ve moved home assistant to it’s own Proxmox VM, I did consider upgrading the Pi to a Pi 4, but found a great script to spin a new VM.

Plusnet are doing some maintenance this month so I am hoping to see an FTTP offering, if not I will be migrating to Zen early next year!

Alexa Curtains

Unifi Network

Unfi Network

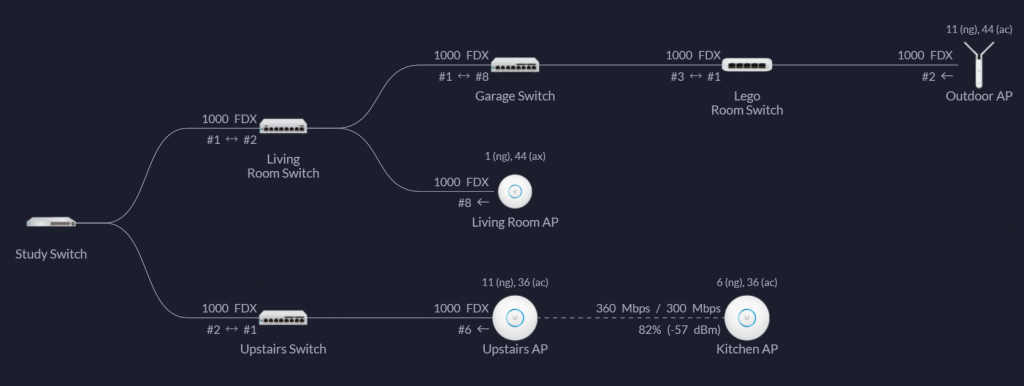
My unifi setup as of November 2020. Access points and network are all on unifi hardware. The gateway / firewall is a OPNSense VM, having abandoned the USG in 2020 in readiness for FTTP.

Unfi Network Diagram showing the setup at home

Smart Home Hardware

Smart Home Hardware

Infrastructure

Alexa

Amazon Alexa, is a virtual assistant, first used in the Amazon Echo and the Amazon Echo Dot smart speakers. She is the central "hub" to all my systems, start with an Echo Dot and build it from there! Just added an echo auto to my car and it's changed everything all over again!

OPNsense - Firewall

OPNsense is an open source, easy-to-use and easy-to-build HardenedBSD based firewall and routing platform. OPNsense includes most of the features available in expensive commercial firewalls, including IPS / IDS. I only really use OPNsense as a firewall, IPS/IDS and VPN server, but you can use it for almost all network scenarios.

Unifi - Networking

Although no the cheapest solution on the market. The centralised management and power over ethernet make them a worthwhile investment. They are ideal prosumer devices.

Unifi - Cameras

Unifi's CCTV solution is brilliant, the Flex is the bargain of the range and well worth the investment. Using the 3rd party monocle skill (https://monoclecam.com/) you can ask Alexa to bring up any of your cameras, with minimal setup.

Home Assistant

Open source home automation that puts local control and privacy first. Powered by a worldwide community of tinkerers and DIY enthusiasts. Perfect to run on a Raspberry Pi or a local server.

Hardware

Broadlink

Using the Broadlink mini RM 3. You can control a number of IR devices using Alexa. Make sure you purchase an EU version or it won't work! Suited for the bedroom, kitchen or study, where the harmony hub is overkill. Be warned always setup devices as TVs for them to show up in Alexa.

Wiser

My second smarthome heating system, the first a Salus didn't support Alexa. The wiser system does and the app is brilliant!

Sonoff

The cheapest and most flexible devices in my current smarthome. Using the ewelink app to create scenes and linking the solution with Alexa for voice control. The app recently got a much needed update!

Harmony

By far the best control system for A/V equipment. The app is great the Alexa skill is one of the best I have. Full control of multiple devices and routines within the app are simple. A worthwhile investment!

Philips Hue

Everyone has heard of Hue, it is an expensive system, but by far my favourite lighting system out there. So far I have only used the bulbs and motion sensors, but am considering an outdoors project next Spring!

SwitchBot Curtain

Curtain bots are cool and at £60 per set of curtains, a lot cheaper than the £400 rails I was looking at before!

Govee

The only govee product I own is the ambilight which is great for watching films, I only really use this with Alexa to create scenes and automation routines.

Shelly

Possible replacement for Sonoff with a much more open approach to development and firmwares.

Flic Button Logo

Flic

A small button that can control nearly any connected device or service with a push. Simple smart light switch, advanced routine trigger, etc. I mainly use these buttons to control lights and mix manufacturers. They work really well with node-red which is something I am building on especially in the smart static project!

Hacking

Tasmota

Total local control with quick setup and updates. Control using MQTT, Web UI, HTTP or serial. Automate using timers, rules or scripts. Integration with home automation solutions. Incredibly expandable and flexible.

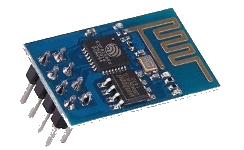
ESP8266

The IoT hackers board of choice. They are cheap and easy to program. Buy 2 to start with just in case you smoke one (like I did).

AWS

AWS is amazon's cloud computing services. You can create amazing skills and routines for really customising your smarthome routines. AWS is also the infrastructure behind Alexa.

NFC

Often found on your phone NFC is the technology used in contactless payments. You can buy simple stickers that when you pass a phone near can trigger actions. Such as joining a wifi network, turning off a light, etc. I have linked to a starter pack which I would recommend.

Old Stuff

LightwaveRF
(Retired 2020)

The oldest component in my smarthome system. I still recommend lightwave for controlling devices like lamps, plug sockets and other plugin systems. The new generation support two way comms, but I haven't moved to gen 2.

Unifi - USG
(Retired 2020)

The unifi USG is the protector of the perimeter of my smarthome. Offering a robust firewall and some advanced features including VPN (remote access) and IDS / IPS (intrusion protection and detection).

IFTTT
(Retired 2020)

IFTTT makes it easy to create simple actions that you want to trigger using something like an AWS IOT button, NFC sticker or an ESP8266 creation.
Removed due to subscription costs!

TP-Link
(Retired 2020)

TP-link make great networking kit, ideal if you are just starting out. My first tip would be to get rid of your ISP supplied router and go with a tp-link. They also make a range of Alexa compatible plugs that don't require a hub.

NEOS
(Retired 2021)

An insurance company that sells incredibly cheap (and good) internal cameras that work with Alexa. The app is ok and includes geofencing for auto arming.